March 2019 #FP4Party .. All my images together …..

I only shot one roll for the last #FP4Party last month and here are all my images together …. Shot using my Nikon F100 and the Sigma 105mm f2.8

Please click a photo to view larger

All images on my blog are available as prints just drop me an email

I also have a film only blog over at  usingfilm.wordpress.com if you want a peek 🙂


Ricoh Singlex TLS …. with some ilford HP5@800 ….

Over the last few months I have been going through my camera collection and deciding on which cameras that I will probably use on more than one occasion and selling or gifting the ones that I have only used the once.

Enter the Ricoh Singlex TLS … I picked this up well over a year ago in a job lot of other cameras and I had not got around to using it so it was time to try it out and if I enjoyed the experience and it worked fine I may keep it.

To be honest the shooting experience was ok, not the most enjoyable but the camera was a bit cumbersome to use but after developing & scanning the images were great so I was happy to pass this camera on to someone else who may enjoy the experience more than I.

It went up on eBay and sold pretty quickly which surprised me and is now in some other #believeinfilm shooter.

Anyway here is a selection of the images shot on HP5+ at 800 iso.

Please click a photo to view larger

All images on my blog are available as prints just drop me an email

I also have a film only blog over at  usingfilm.wordpress.com if you want a peek 🙂


Disaster or Happy accident? … 1st time shooting Rollei CR200

Last week I partook in a film swap with a twitter friend who had never shot my favorite colour negative film” Fuji Reala ” so I sent him some in return for some of his film one of which was a roll of Rollei CR200 colour reversal film in 120 format.

I have never shot this film before so I was intrigued to find out how it looked so I loaded up my Fuji GW690iii and visited my favourite tree and shot away.

I returned home and processed the film as normal in the Tetenal E6 kit and when they emerged out of the tank they seemed ok at 1st glance when I hung them to dry.

The only difference in my procedure was that I left it to dry overnight so when I went to scan it I was really confused as the colours were totally wrong, I immediately thought that I had my scanner settings wrong but after a few attempts with different settings nothing changed much or got even worse.

I dug out my lightbox and had a look at the film which instead of having the usual black rebate/frame it was purple.

I double checked the box that it was actually a reversal film incase I had got it wrong and obviously it was.

So to cut a long story short I have absolutely no idea what went wrong here … it does appear a bit like Solarization but no light got to the film while I was developing so I can only assume that the roll of film has had a very varied storage life.

So here are the images …. any comments welcomed …

After my initial shock and disappointment I actually really like the look and would love to be able to replicate it 🙂

Please click a photo to view larger

All images on my blog are available as prints just drop me an email

I also have a film only blog over at  usingfilm.wordpress.com if you want a peek 🙂


February 2019 #FP4Party .. All my images together …..

This is the 2nd #FP4Party of the year and this time I managed to shoot 2 rolls of FP4 with 2 different cameras.

I tried out my recent purchase the “Lomography Fisheye 35mm” as well as my trusty Mamiya 645.

I was very happy to find out that 3 of my images were shortlisted this month ….

These are the 3 along with all of the others …

The best of the rest …


One’s that didn’t make the cut ….

Please click a photo to view larger

All images on my blog are available as prints just drop me an email

I also have a film only blog over at  usingfilm.wordpress.com if you want a peek 🙂

Fuji Sensia 200 expired and scanning twice …..

I am really slacking with my photography this year … so far I have only managed to shoot 8 rolls and 3 of them were for the #fp4party.

I know that equates to 1 per week but this ratio is pretty poor for me and my blogging is also behind.

So this week I am hoping to get at least 2 posts done just to catch up …. here is the 1st … A roll of Fuji Sensia 200 that expired back in 2004 that I shot on a pretty dull afternoon using the Olympus OM2s, Zuiko 50mm f1.4 and developed using the Tetenal E6.

After development and subsequent scanning using the Epson v500 all the images had a slight magenta cast and due to a nasty curl quite a few frames didn’t appear very sharp.

So after deciding on which frames that I liked I rescanned them using the Plustek Opticfilm 8100 and Silverfast 8 software which gave far better results especially the sharpness due to the better film holder which keeps the film so much flatter.

I am not really sure if the magenta cast was due to my dev going off or just the film itself but it was very easy to remove in Lightroom.

Anyway here is a selection from the roll … there are a few shots containing Daffodil’s (National flower of Wales) which are blooming nice and early this year also my Obligatory end of roll Peg shot 🙂


Please click a photo to view larger

All images on my blog are available as prints just drop me an email

I also have a film only blog over at  usingfilm.wordpress.com if you want a peek 🙂

Snow Day on some Kodak DoubleX 5222 ……

At the beginning of this month we managed to get a bit of snow here in the South Wales valleys, just enough to get me a day off work so as not to waste the day off I went for quite a long walk with my Nikon F100 loaded with some Kodak DoubleX which I had shot a roll of a while back and was pretty happy with how the film looked, nice grain/contrast while also giving a good tonal range.

When I shot it previously I developed it in Rodinal so this time I went with ilfotecHC at 1+49 dilution for 7 minutes as I rated the film at iso 200.

I was far happier with the result this time as the grain was far smoother while still giving great contrast and tones, only on a few frames did I slightly blow out some highlights as I was over exposing by at least one stop for most of the images due to the snow coverage.

Anyway I have to say that even though this is only the 2nd roll of this I have tried I really, really like it and will be definitely buying some more.

So here is a selection of the images ….

Please click a photo to view larger

All images on my blog are available as prints just drop me an email

I also have a film only blog over at  usingfilm.wordpress.com if you want a peek 🙂

#FP4Party 2019 .. all the posted images together

As ther new year begins so do the twitter Film Parties …. beginning with #FP4Party where as the title suggests you shoot some ilford FP4  during shoot week then develop in the 2nd week followed by … you guessed it post your images during the 3rd week.

For this challenge I used my Minolta SRT 101 with the Rokkor 55mm f1.7 which is a combination that I really enjoy using and one roll of FP4+ rated at 200 iso.

I was pleased to say that I had a really good hit rate with the roll with plenty of keepers which are here all together.

Please click a photo to view larger

All images on my blog are available as prints just drop me an email

I also have a film only blog over at  usingfilm.wordpress.com if you want a peek 🙂

Diana F Pinhole shooting on Lomo Color Negative 400…

This year it is my intention to shoot more so called LoFi images.

I enjoyed my time shooting with the Littlest Holga and since modifying my own Holga so now I can actually get some usable images (see blog post from a few weeks back) I love the look and feel the plastic cameras can achieve.

So over Christmas I loaded up my Diana F with some Lomography Color Negative 400 and shot the roll in Pinhole mode.

The light was pretty consistent as I was checking with my light meter which gave me an approximate shutter time of 10 seconds after looking up cloudy days and Diana pinhole on the trusty internet.

After development and scanning I was pleased that the exposures were pretty spot on.

The only problem was that I shot the roll at the 16 frame setting without the frame mask so all the images pretty much touched or overlapped a bit which gave an interesting look but I scanned each one individually and cropped slightly.

Anyway here are the images any comments most welcomed.

Here is what the actual frames originally looked like.

Please click a photo to view larger

All images on my blog are available as prints just drop me an email

I also have a film only blog over at  usingfilm.wordpress.com if you want a peek 🙂


Bargain compact point & shoot of the year … Pentax Espio 140M & ilford XP2


A year or so ago I took part in a Camera challenge on twitter where you had to buy a cheap camera and shoot a roll of film and post the results.

I blogged the post here

Camera-challenge blog

That was the 1st and last time that I shot the camera but I was looking for a small compact camera to keep in my bag just to shoot as and when I came across anything vaguely of interest so I went through my collection and decided to revisit this little camera but this time load it with a decent roll of film.

So I loaded it with some ilford XP2 and used it over the last two and a half months, finishing it off on christmas day.

Obviously this roll has quite a varied subject matter that tested this camera … Landscape, Street, Macro and flash and once I developed the roll and saw the scans I was so impressed with how the camera performed … the exposures was spot on and the sharpness of the lens was superb, the only downside was the fairly slow aperture especially if you use the zoom but to be fair it didn’t hinder me at all.

The most useful feature for me is a spot focus mode and a Landscape mode which lets you focus at infinity both modes worked like a dream.

There are a few different flash modes, a Panorama mode which just crops the frame I think (not tried that yet) and a remote control to fire the camera.

All in all this is a right little powerhouse of a compact camera that works well in every situation I threw at it and also handles an looks good too.

I picked this up for less than a fiver and if you look on eBay you can still get it at a bargain price.

Anyway here are the images …. comments most welcome

Please click a photo to view larger

All images on my blog are available as prints just drop me an email

I also have a film only blog over at  usingfilm.wordpress.com if you want a peek 🙂


My Crappy Holga re-visited with some Foam/Card and Tape on ilford HP5 …..

Since my lovely experience shooting the Littlest Holga for over a month a while back and producing a zine which was well received by my film photography peers I wanted to start shooting more Lomo style images alongside my other photography.

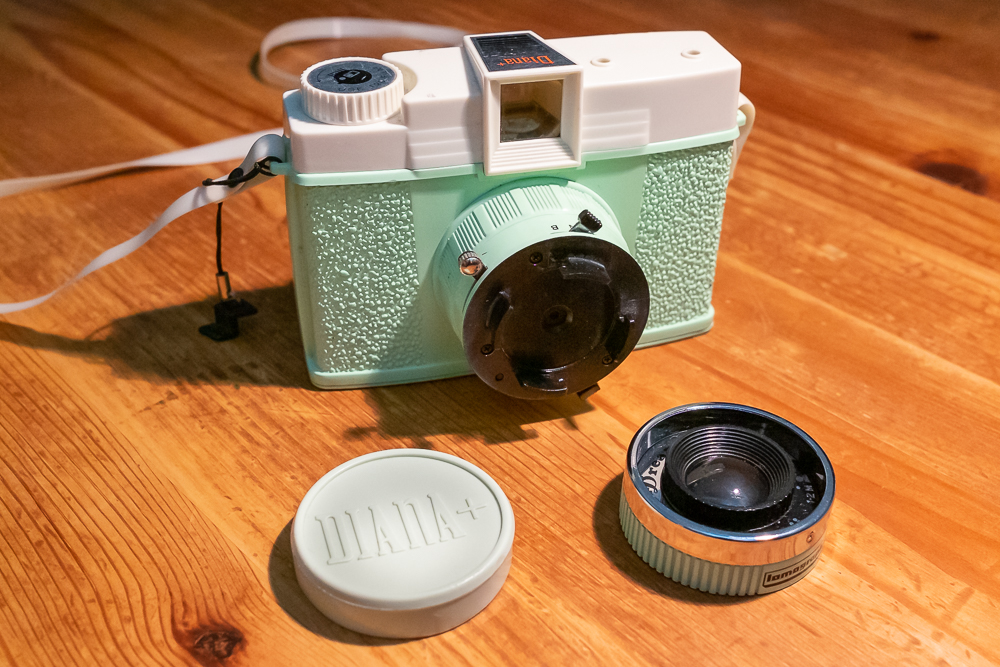
I already have a Diana F+ (which may feature in my 1st blog of 2019) … a Lomo Actionsampler and a Holga 120GN.

Since owning my Holga I have shot numerous rolls of B&W/C41 and Slide with very little to show in the way of usable images.

I always thought it was possibly my incompetence with the camera but after using another holga and getting loads of images that I was extremely pleased with I came to the conclusion that it was something not right with my copy.

The main problems were horizontal film scratches, huge light leaks that obliterated large areas of the image and ultra soft focus or even totally blurry images.

I realised that my Holga didn’t come with any film masks as I bought it 2nd hand from eBay so my 1st mod was to make my own mask which I guessed the size of by measuring the mask in my Diana  and attached it to the inside using black tape.

I then replaced the foam on the take up side as it was perished and I did notice that I was previously getting fat rolls.

And lastly I attached similar foam pieces on the back door in the hope of keeping the film flatter and hopefully getting a bit better focus on the frames.

I loaded up a roll of my Favourite film ilford HP5+ which as the weather was really dull, overcast and drizzle I took a meter reading with my Sekonic meter and decided to rated the film at 800 iso and developed it in Rodinal at 1+25 dilution for 8 minutes with the intention of getting the best sharpness from the film.

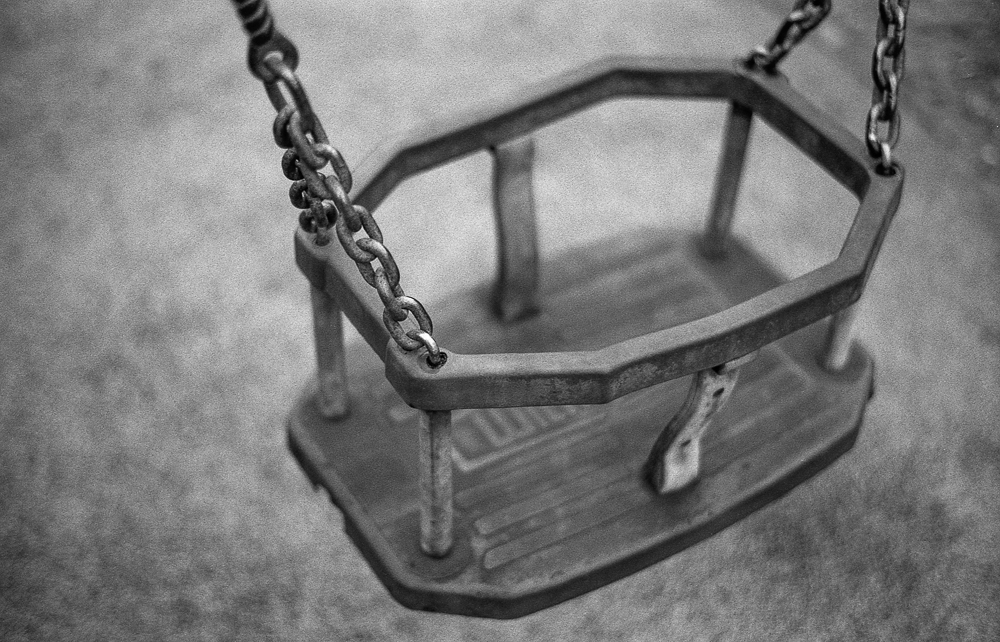
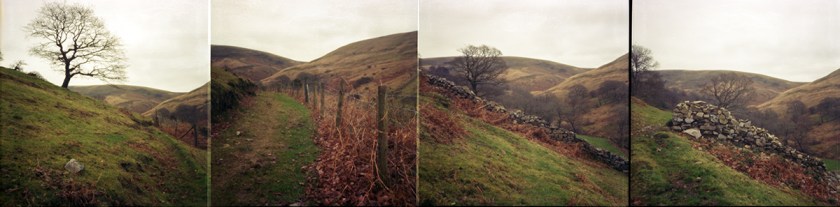
Once scanning the film I was so pleased to find the images were such a vast improvement over any previous images that I have ever got from this camera and I was justified for playing around with the insides.

Ok … these are not a patch on what I get with a camera like my Fuji GW690iii but that is not what it is all about … these images are exactly what I want from my Holga and I am looking forward to shooting it on a more regular basis in the new year along with my other Lomo style cameras (I have already purchased a Lomo Fisheye).

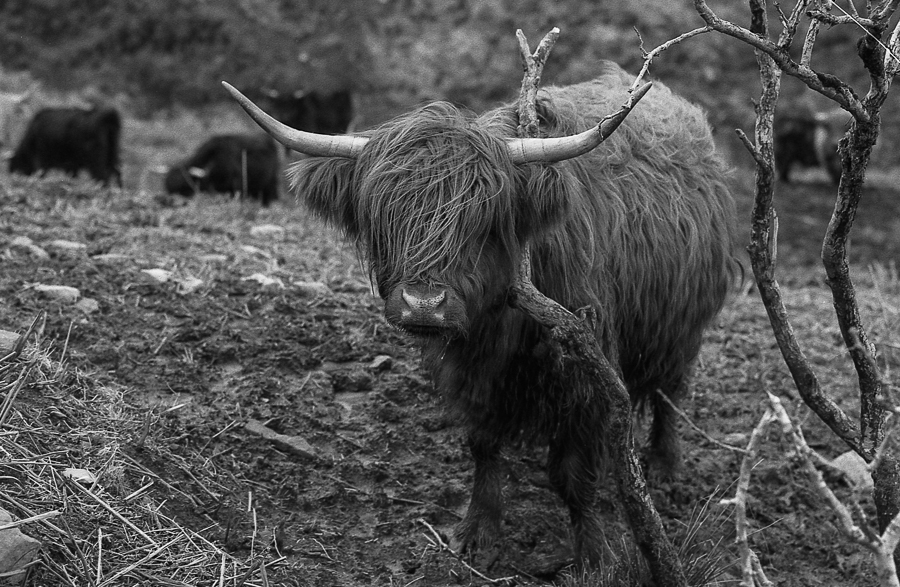
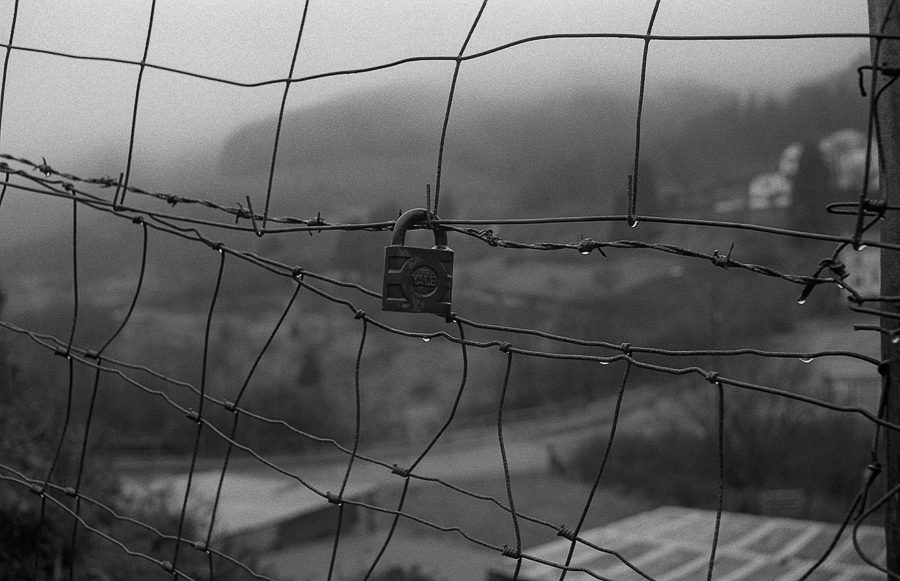
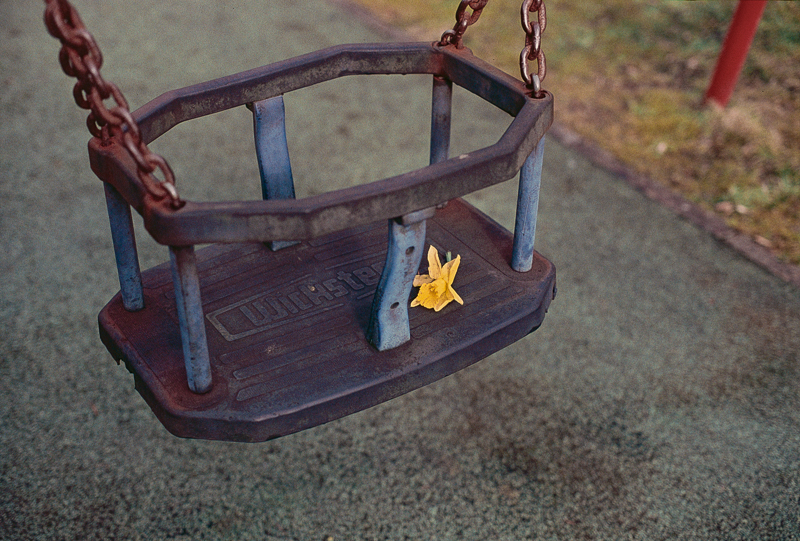
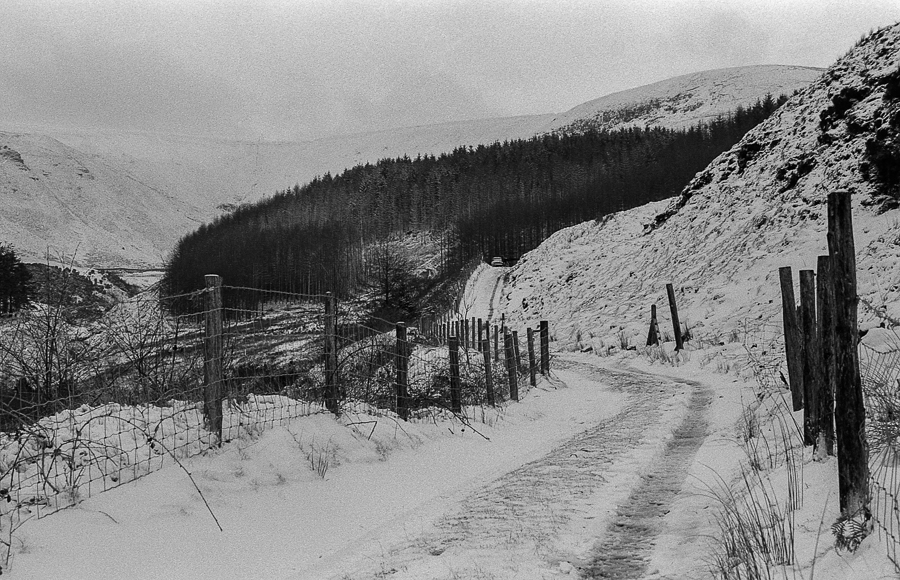
Anyway here are some of the images ….

Please click a photo to view larger

All images on my blog are available as prints just drop me an email

I also have a film only blog over at  usingfilm.wordpress.com if you want a peek 🙂

Posted